Table of Contents
When you visit a website and encounter a “404 Error” message, it means that the server couldn’t find the page or file you were looking for. WordPress 404 errors occur when someone requests a page or file that doesn’t exist, which can happen due to various reasons. However, it’s important to note that 404 errors are not inherently bad and can be easily managed and resolved. In this article, we will explore what WordPress 404 errors are, why they happen, and how to effectively manage them.
Understanding 404 Errors
A 404 error is a standard HTTP response code that indicates the server couldn’t locate the requested page or file. When the browser requests a page that is not available, the server sends back the 404-error code to tell the browser that the resource is not available. The browser then usually presents a “404 not found” message to the user.
Reasons for 404 Errors
There are several common reasons why WordPress 404 errors occur:
- Typing or Linking Mistakes: Users may accidentally type a wrong URL or click on a broken link that leads to a non-existent page.
- Changes in Permalink Structure: If you modify the permalink structure of your WordPress site without properly redirecting the old URLs, it can result in 404 errors.
- Deleted or Moved Pages: If you delete or move a page without setting up proper redirects, users may encounter 404 errors when trying to access the old URLs.
- Incorrect File Permissions: Improper file permissions can prevent the server from accessing and displaying the requested content, leading to 404 errors.
- Poorly Coded Plugins or Themes: In some cases, poorly coded plugins or themes can cause conflicts or errors that result in 404 pages.
Why 404 Errors Are Not Inherently Bad
While encountering a 404 error can be frustrating for users, it’s important to understand that these errors are not always a cause for concern. In fact, 404 errors are a natural part of maintaining a website and can occur even on well-managed sites. Here’s why 404 errors are not inherently bad:
- Website Restructuring: As websites evolve, pages and URLs may be modified, deleted, or moved. 404 errors can indicate that the website is undergoing restructuring and content is being updated or otherwise temporarily unavailable.
- User Error: Users may mistype URLs or click on broken links. 404 errors help them understand that the requested content is not available, allowing them to navigate to other parts of the website.
- Search Engine Optimization (SEO): When search engines encounter 404 errors, they understand that the requested content is no longer available. This helps search engines update their indexes and prevent users from landing on irrelevant or outdated pages.
It’s important to strike a balance between addressing and resolving 404 errors while also recognizing that they are a natural part of website management. In short, not all 404 errors need to be fixed.
How to Manage and Fix WordPress 404 Errors
Now that we understand the nature of WordPress 404 errors, let’s explore how to effectively fix them and provide a better user experience. There are several ways to handle 404 errors in WordPress. In this article, we’ll focus on using default WordPress features and the Rank Math SEO plugin. To continue following along on your website, you will need to have Rank Math SEO installed. You can follow this guide for how to install plugins: How to Install, Add, and Use WordPress Plugins | HubSpot
1. Regularly Monitor 404 Errors
To effectively manage WordPress 404 errors, it’s crucial to monitor them regularly. Rank Math comes with a 404-monitor module that helps you do this. To activate the 404-monitor in Rank Math, go to your WordPress admin > Rank Math SEO > Dashboard and toggle on “404 Monitor”.
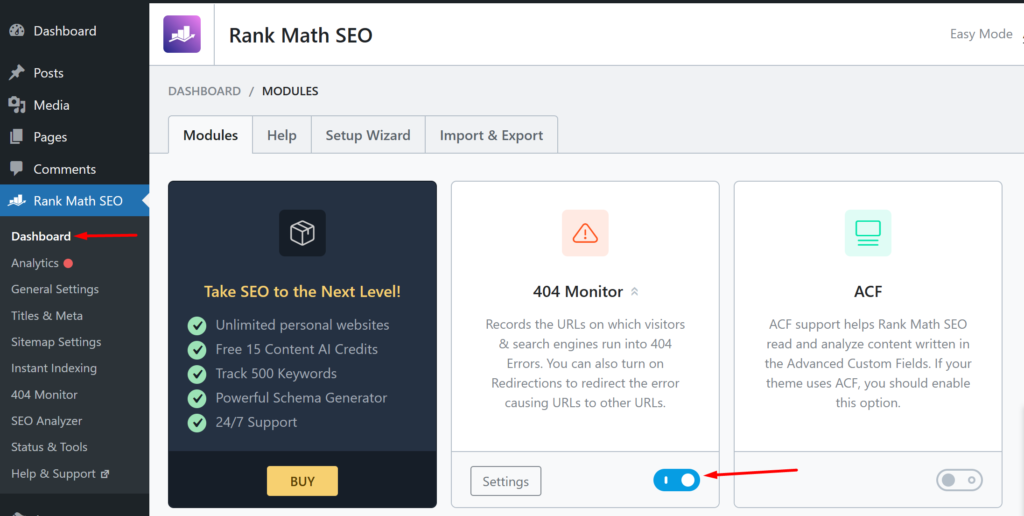
The 404 monitor registers 404 errors from the time of activation going forward. Depending on the amount of traffic and size of your website, you may need to wait a few days before you get any errors. You can check the 404 errors by going to WordPress admin > Rank Math SEO > 404 Monitor
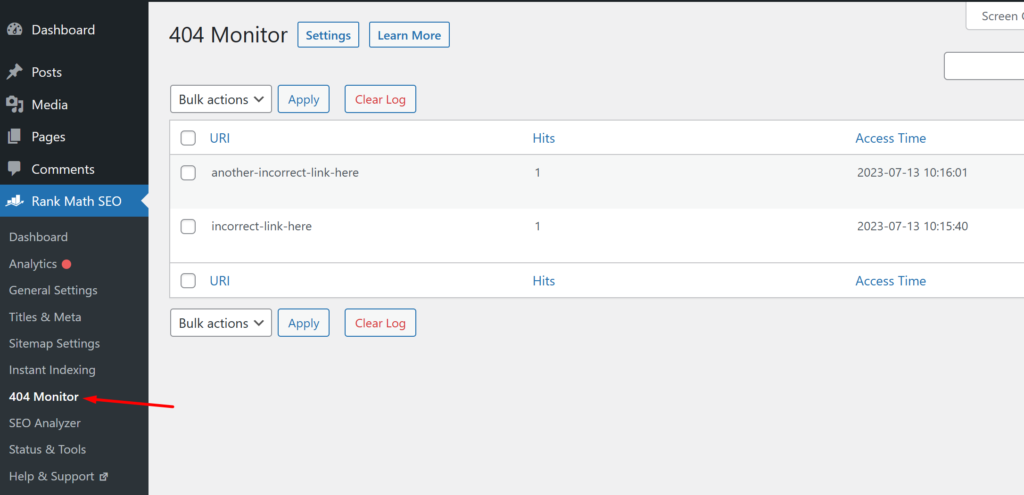
The default 404 monitor page shows a table with 3 columns:
- URI: The URLs of the pages that were not found
- Hits: The number of times each URL was visited
- Time: The date and time the URL was visited
2. Analyze the Source of 404 Errors
The default 404 monitor view gives you basic information that will help you decide what to do with the 404 errors. If you want more detailed monitoring, like tracking down the source of 404 errors, you will need to activate the advanced view in the 404 monitor. To do this, go to your WordPress dashboard > Rank Math SEO > General Settings > 404 Monitor and click on the “Advanced” button.
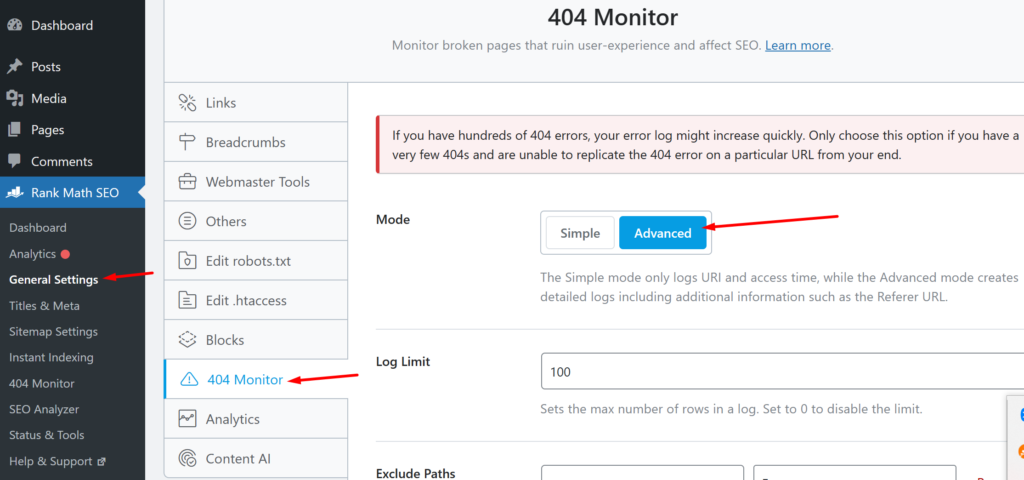
Note: You should only activate the Advanced mode in the 404 monitor when you are investigating the cause/source of a recurring 404 error that you want to get rid of. The advanced mode should be used sparingly as it uses a significant amount of resources that can impact the performance of your website. After activating the advanced mode, wait a few hours or days depending on your traffic and check the 404 monitor page.
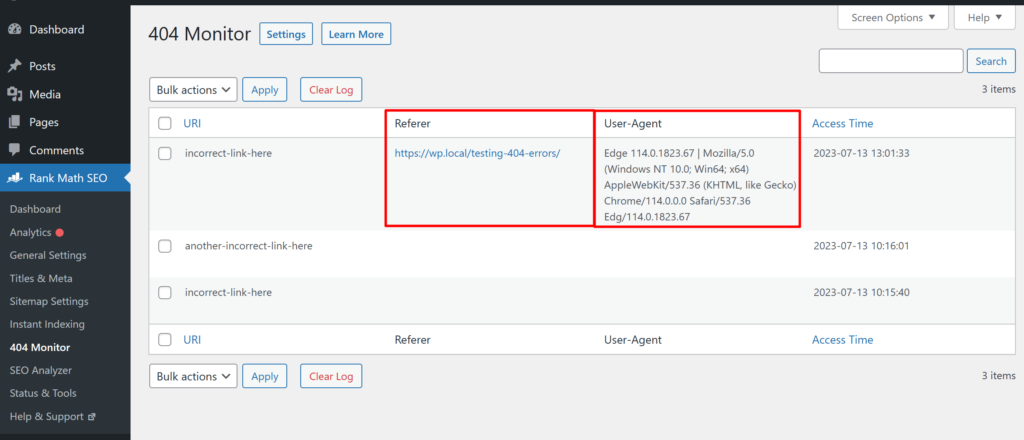
After activating advanced mode, the 404 monitor will no longer have a hits count. There will be two new columns instead, “Referrer” which shows the URL of the page with a broken link displayed on it, and the “User Agent” column which shows some device and browser information about the device the 404 page was displayed on.
If the 404 Error is coming from a page on your website, you can edit the page and place the correct URL or delete the link to stop getting the 404 error. If the referrer is on another website, you can try contacting the website’s owner and ask them to update their page with the correct link. If you can’t get them to update their page, you can create a 301 redirect to a relevant URL on your website. The section below details how to set up 301 redirects.
3. Set Up Proper Redirects
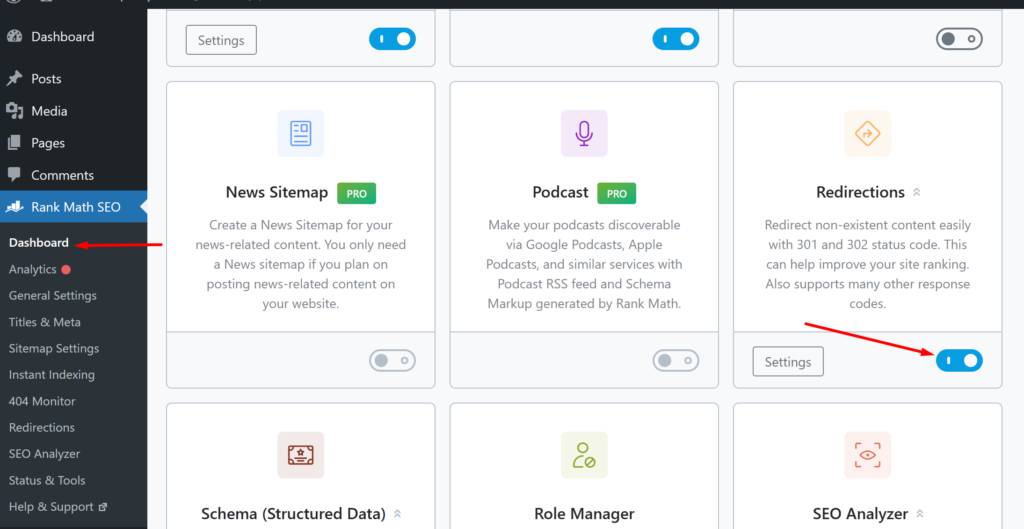
Redirects play a crucial role in resolving 404 errors. If you have changed the permalink structure of your WordPress site or moved/deleted pages, it’s important to set up proper redirects. This ensures that users who access the old URLs are automatically redirected to the new or relevant pages. To create 301 redirects with Rank Math, you need to activate the “Redirections” module. Go to your WordPress admin > Rank Math SEO > Dashboard and toggle on “Redirections”
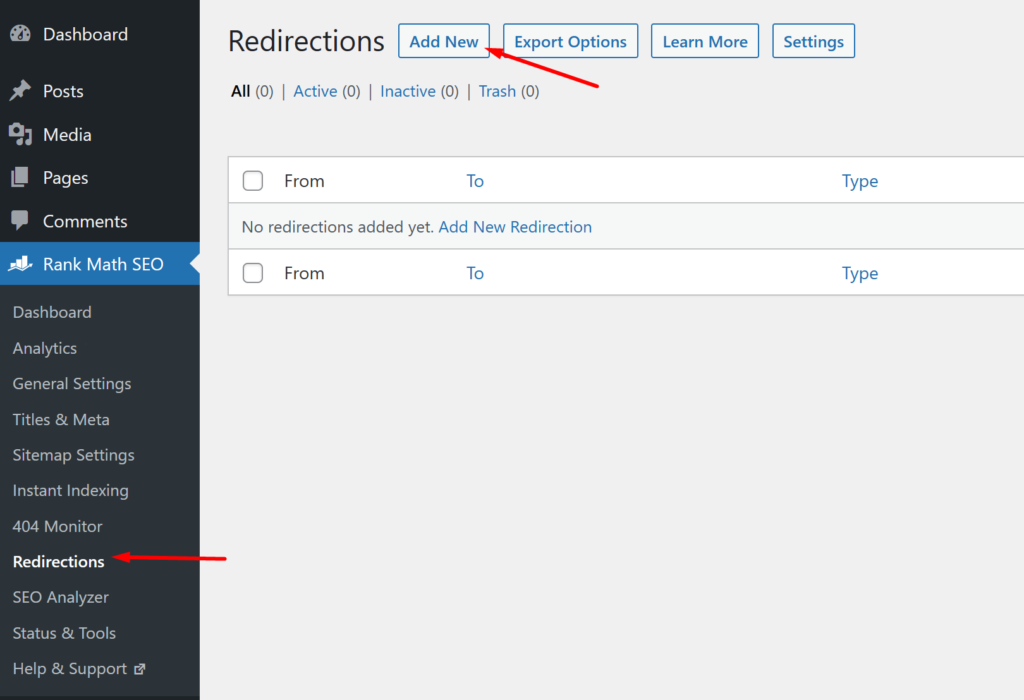
To create a new redirect, go to WordPress Dashboard > Rank Math SEO > Redirections and click “Add New”.
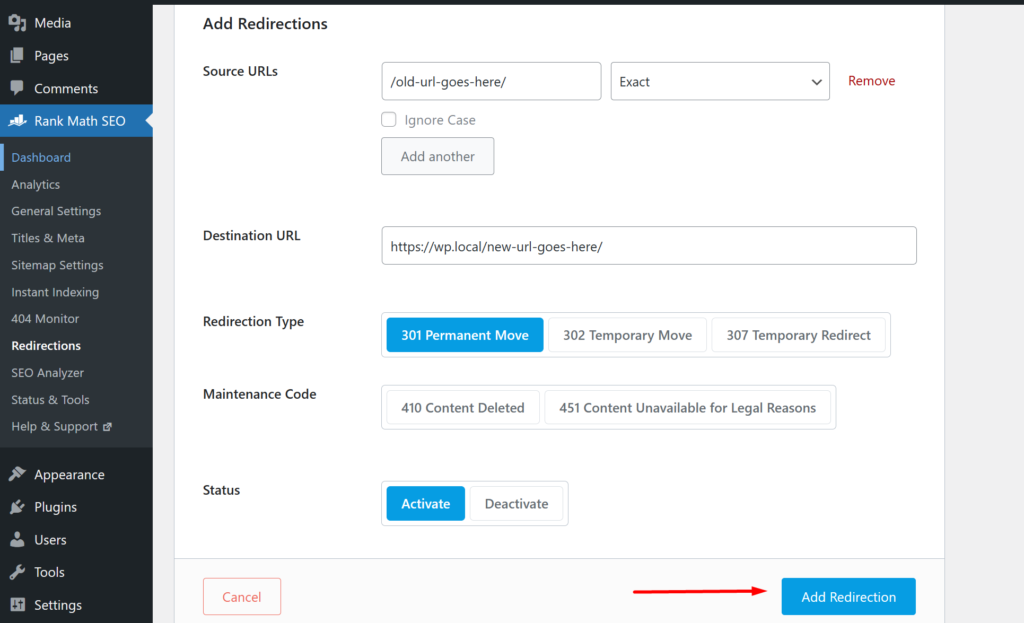
In the redirect editor screen, enter the “Source URL”, the old/incorrect URL you would like to redirect from. Next, enter “Destination URL” where you would like the new URL to point to. You can then click “Add Redirection” at the bottom of the editor screen. Your redirect will be saved, and you can click “View”, below the redirect to test if it’s working.

For a more detailed guide on creating 301 redirects with Rank Math, and to understand the redirect settings we ignored, please refer to the following article: How To Set Up Redirections
4. Customize Your 404 Error Page
When users encounter a 404 error, it’s important to provide them with a helpful and user-friendly experience. Customize your 404-error page with a clear message, search/navigation options, and relevant links to guide users back to your website’s main content. This can help reduce bounce rates and enhance the overall user experience.
You can refer to the following articles for how to customize your 404 page:
- How to Improve Your 404 Page Template in WordPress | WPBeginner
- How to Edit a 404 Page in WordPress (Customization Guide) | WP Buffs
- How to Create a Custom 404 Page in WordPress | PPWP PRO
5. Use a Reliable Hosting Provider
Sometimes, 404 errors can occur due to server issues or downtime. To minimize such errors, ensure you are using a reliable hosting provider that offers high uptime and robust server infrastructure. This helps ensure that your website is accessible to users and reduces the chances of encountering server-related 404 errors.
6. Keep Plugins and Themes Updated
Outdated or poorly coded plugins and themes can cause conflicts or errors, including 404 pages. Regularly update your plugins and themes to their latest versions to ensure compatibility, security, and optimal performance. Additionally, choose reputable plugins and themes from trusted sources to minimize the risk of encountering errors.
7. Use a Caching Plugin
Caching plugins can significantly improve website performance by storing static versions of your web pages. This reduces the load on the server and decreases the chances of encountering 404 errors due to slow or overloaded server responses. Choose a reputable caching plugin and configure it correctly for optimal results.
The following articles review some of the best WordPress Caching plugins:
- 5 Best WordPress Caching Plugins to Speed Up Your Website (2023) | WP Beginner
- 9 Best WordPress Cache Plugins in 2023 (For Site Speed) | Elegant Themes
8. Regularly Review and Update Your Website Content
Continuously reviewing and updating your website’s content, URLs, and internal links can help prevent 404 errors. Conduct regular audits to identify outdated or irrelevant pages and remove or update them accordingly. This ensures that users are always directed to relevant and up-to-date content.
Conclusion
WordPress 404 errors are common but not bad. By understanding their reasons and implementing measures to handle them, you can improve user experience and website performance. Monitor 404 errors, set up redirects, customize your 404-error page, improve navigation, and update plugins and themes to manage WordPress 404 errors effectively. They are also an opportunity to enhance user experience and optimize search engine rankings.

Leave Your Thoughts Here…